
In this guide, I’ll show you how to integrate Cloud of Worship with OBS Studio using the livestream URL.
Cloud of Worship makes it easy to share worship lyrics and multimedia content, and combining it with OBS Studio enhances your livestream experience for church services, events, and more.
Let’s break down each step to make sure the process is straightforward. Here are the highlighted steps:
- Open Cloud of Worship and copy livestream URL
- Open OBS and add a new Browser Source
- Configure the Browser Source
- Adjust the Position and Size of the Browser Source
- Test and Go Live
Step 1: Open Cloud of Worship and Copy Livestream URL
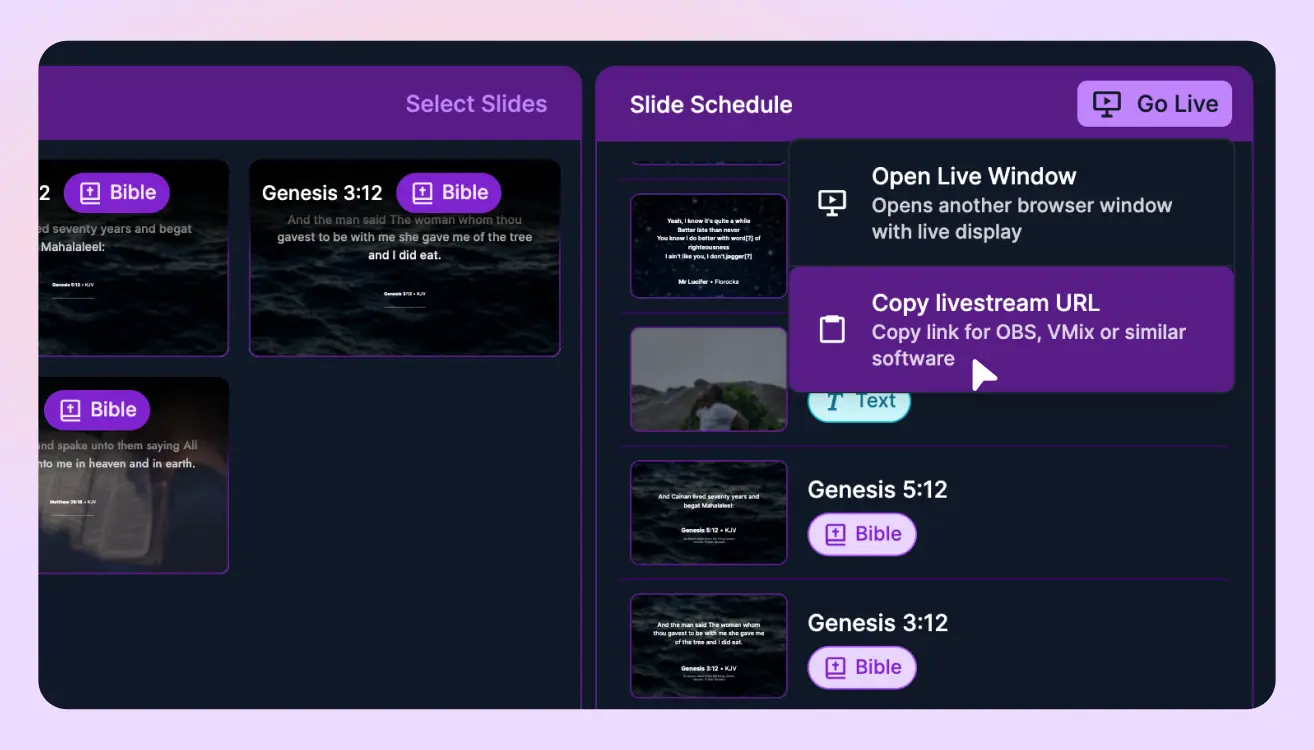
- Log into Cloud of Worship: Start by logging into your account at app.cloudofworship.com.
- Find the Livestream URL: Once logged in, navigate to the Livestream section. Here, you’ll see the URL for your live worship stream, which should look similar to this format: app.cloudofworship.com/livestream/livestream_id, Copy this URL, as you’ll need it shortly.
Step 2: Open OBS Studio and Add a New Browser Source

- Launch OBS: Open your OBS software on your computer. Ensure you have an updated version to avoid compatibility issues.
- Add Input: In the lower left corner, click on the Add Input button. This will bring up the “Add Input” menu, allowing you to add different types of media sources.
- Launch OBS Studio: Open OBS Studio on your computer and make sure it’s updated to the latest version to avoid any compatibility issues.
- Create a New Scene or Choose an Existing One: If you don’t already have a scene set up for your live worship, create a new scene by clicking the + button under Scenes. Otherwise, select the scene where you want to add Cloud of Worship.
- Add a Browser Source: In the Sources box, click the + button and select Browser from the dropdown menu. This will let you add a browser-based source like Cloud of Worship.
Step 3: Configure the Browser Source
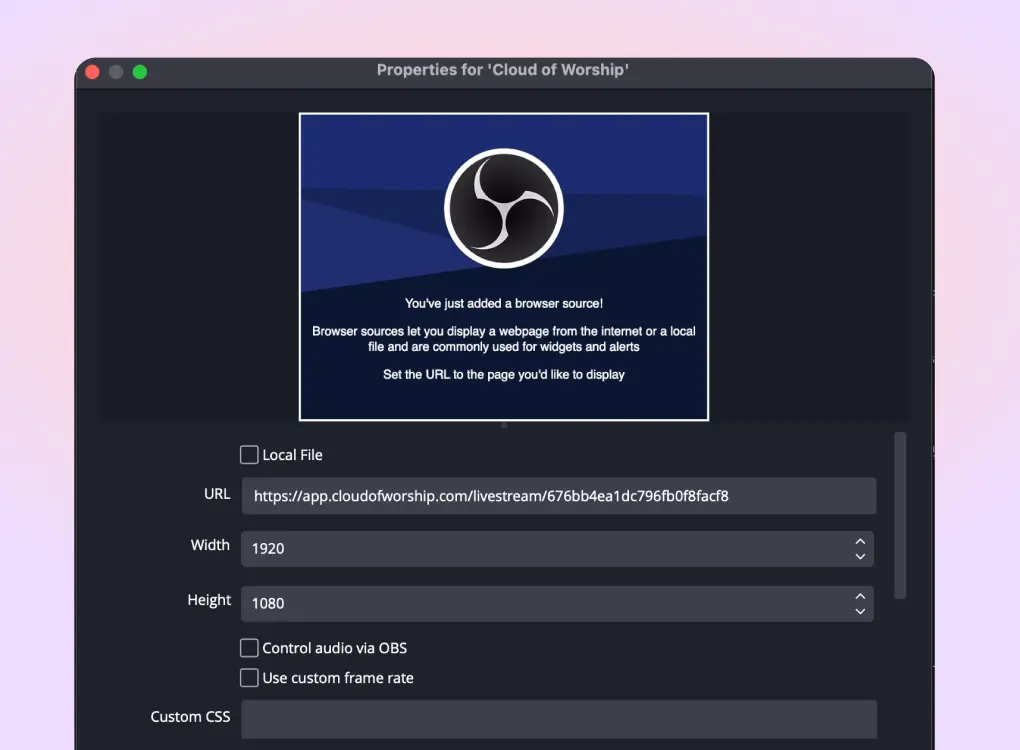
- Name the Source: When prompted, give your new source a name, like “Cloud of Worship,” to make it easy to identify.
- Paste the URL: In the URL field, paste the livestream URL you copied from Cloud of Worship.
- Set the Resolution (Optional): OBS lets you adjust the width and height of the source, so you may want to set the resolution to match your stream settings, such as 1280x720 or 1920x1080, for a clear display.
- Remove Custom CSS: Clear out any custom CSS that is added by default to affect interference of the livestream display.
- Confirm Settings: Click OK to save your settings and add the source to your scene.
Step 4: Adjust the Position and Size of the Browser Source
- Position the Source: You’ll now see the Cloud of Worship stream in your OBS preview window. Click and drag it to adjust its position within the frame.
- Resize if Needed: Use the corners of the browser source to resize it as needed, ensuring that lyrics or multimedia content are clearly visible. You may choose to center it or position it at the bottom third of the screen for lyrics.
- Set Transparency (Optional): If you’d like the lyrics or content to overlay other visuals, you can adjust the opacity by right-clicking the source, selecting Filters, and adding a Color Correction filter to tweak transparency.
Step 5: Test and Go Live
- Preview Your Stream: Double-check that everything looks right in the OBS preview window. Make sure the text, visuals, and any animations from Cloud of Worship display correctly.
- Start Streaming or Recording: When you’re ready, hit Start Streaming (or Start Recording) in OBS Studio. Your Cloud of Worship feed should now be live, displaying all the lyrics, verses, or multimedia content you’ve set up on Cloud of Worship.
Tips for Optimal Performance
- Stable Internet Connection: Since Cloud of Worship streams through an online URL, ensure you have a stable internet connection for smooth performance.
- Audio Configuration: If your Cloud of Worship feed includes audio, remember to adjust audio levels in OBS to maintain balance with other sources.
- Hotkeys (Advanced): Set up hotkeys to easily switch the Cloud of Worship source on and off if you frequently toggle between content types during a service.
Known Issues and Limitations
While Cloud of Worship integrates smoothly with OBS Studio for displaying lyrics and a variety of content, there are a few known limitations to be aware of.
Currently, certain features like countdown slides and video slides do not function as expected when used through the livestream URL.
For now, it’s best to handle countdowns or video segments using the desktop capture input or through alternative sources until these limitations are addressed in future updates.
Conclusion
Adding Cloud of Worship to OBS Studio with a livestream URL is a simple process that greatly enhances the quality and professionalism of your worship broadcasts. With just a few steps, you can integrate live lyrics, verses, and visuals into your streams, creating a more engaging worship experience for your viewers.
By using the livestream URL as a browser source in OBS Studio, you’re ready to share dynamic, immersive content with your congregation. Enjoy streaming!